Monday, December 27, 2010

Mary's Trash To Treasure


Mary's Trash To Treasure Tutorial

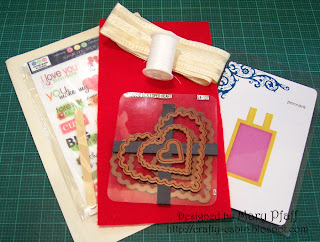
Heart Pillow


Supplies:
Spellbinders - Classic Scalloped Heart S4-137 #6
QuicKutz - Pennant
Three Bugs In A Rug - Sugar & Spice Rub On #rub-223
The Paper Company - Cream Cardstock
Red Felt
Cream Ribbon (Not sure what brand from Teresa)
Cream Thread 7amp; needle
6 Cotton Balls (recycled)
Bamboo Skewer


Directions:

Cut two scalloped hearts from red felt. Hand stitch around edge. Stuff with cotton balls. Inserted 10" folded ribbon. Stitch close.


Cut Pennant from red felt. Cut cardstock. Rub on "I Love You...". Glue to red felt Pennant. Glue to Bamboo Skewer. Insert skewer into pillow.

Tie bow. Glue to front of red Heart Pillow.

Thank you for stopping by this month's Trash To Treasure tutorial, we here at CMIT hope your holiday was merry, we wish you a bright and safe New Year.


Monday, December 20, 2010

Marge's Monday Card Corner


Materials (products available at Creating Everlasting Memories in Bold):

White, turquoise, brown & beige CS
My Mind’s Eye: Where the Heart Is DP (BG, tree trunks, tree tops)
QuicKutz Dies: (Trees, House & Mini Van -- hub cap only for wreath!)
FlowerSoft
ZVA Creative Self-Adhesive Pearls
May Arts Satin Reverse Ribbon 3/8”
Tim Holtz Distress Ink (Antique Linen)
Copic Marker (Y11 Pale Yellow)
Q-Tip
Inkadinkado stamp

Directions:

Using a white 5” x 7” card, cover the front with turquoise CS
Cut BG DP 6 ¾” x 4 ¾”, distress edges with Antique Linen ink, glue to card front
Die cut house, trees and mini van’s hub cap (for wreath) from CS in colors shown
Distress pieces with Antique Linen (except wreath)
Using Copic Marker, color large window and glue small window down and color behind it for “light”
Add Pearls to window ledge & for door knob
Using FlowerSoft glue cover bush cut from house die and “wreath” cut from Mini Van die; cover with FlowerSoft
Assemble house as shown, add “smoke” to chimney by pulling tip off Q-Tip
Attach house/trees in place
Stamp sentiment
Add Ribbon “sidewalk” across bottom of card

Wednesday, December 15, 2010

HEIDI'S HOW'D SHE DO THAT? TIPS, TRICKS AND TECHINIQUES

Quick and Easy Vintage Christmas Ornaments

Hello! Are you surviving all the hustle and bustle of the holidays? I can’t believe there are only 13shopping days left and then it will be Christmas!! Well, I don’t know about you but I am always looking for those quick and easy gifts when you need just a little something.


Today, I am going to share with you how you can create these very quick and easy vintage Christmas ornaments.

I selected images from the Crafty Secrets Merry Christmas Creative Scraps. I love the sheets of Creative Scraps from Crafty Secrets; they are filled with so many wonderful images.

Next, I created a framed edge with buttons. I have a jar full of white and ivory buttons and I used different shapes and sizes to create the frames. I used 3-in-1 Advanced Craft Glue from Beacon Adhesives to adhere the buttons.

I used a paper piercer to create holes and then threaded a piece of wire.


I twisted the wire to create hangers for the ornaments. After I had the hangers on I brushed over the buttons with glue and added the chunky glitter.

For an embellishment I punched out snowflakes using the Martha Stewart snowflake punch, inked them with Antique Linen Distress Ink from Ranger and added a Prima rhinestone in the center.

I made some crinkled seam binding using Waterfall and Iridescent Gold Glimmer Mist from Tattered Angels. To create the crinkle seam binding I used White Snug Hug Seam Binding and lightly misted it with the Glimmer Mist, then scrunch into a ball, put the ball into a baggie and tie it up tight with a twist tie and leave it sit over night. When you take the seam binding out the next day it might still be a little damp so fluff it up and set aside to air dry or heat set with a heat tool. Use the crinkled seam binding just as you would ribbon.


Supplies

Paper: Crafty Secrets Merry Christmas Creative Scraps; WorldWin White Cardstock
Ink: Ranger Antique Linen Distress Ink
Punches: Martha Stewart Snowflake Punch

Accessories: Tattered Angels Waterfall, Iridescent Gold Glimmer Mist; Prima e. Rhinestones; Snug Hug Seam Binding; SCRAPBOOK ADHESVIES By 3L White 3D Foam Squares; Sakura Clear Star Gelly Roll Glitter Pen; Beacon Adhesives 3-in-1 Advanced Craft Glue, Gem Tac; Paper Piercer, Wire, Clear Chunky Glitter

Thank you so much for stopping by today! I hope you are staying warm and having a wonderful weekend!

Hugs & Smiles,

Heidi

My Blog: http://embellished-dreams.blogspot.com/

Tuesday, December 14, 2010

ATC TUESDAY

It is that time again, ATC Tuesday. We hope that everyone is enjoying their holiday season.


Supplies:

Georgia Pacific - White Cardstock
The Paper Company - Deep red
Decorative Paper
Colorbox - Peony red, chestnut roan chalk
QuicKutz - Stocking
Spellbinders - Poinsettia Frame, (Holly Berries)
1/8" hole punch
Creative Impressions - 1/8" sheer red ribbon

Directions:

Cut out trading card @ 3 1/2" x 2 1/2".

Cut out socking & extra pieces. Ink edges of stocking Peony Red. Ink toe & heal pieces with Peony Red then Chestnut Roan. Ink white top with Chestnut Roan.

Cut out Holly Berries. Sand. Punch three 1/8" circles. Attach with mount foam.

Cut stocking 1/2" off top. Adhere stocking together with mount foam. Add Holly Berries. Adhere to trading card.

Adhere loop & bow to top of stocking.


Materials:

My Mind's Eye 'Love Nest' 12"x12" Paper Pad
QuicKutz Die: Trees
Tim Holtz Antique Linen Distress Ink
ZVA Creative Pearls

Instructions:

1) Cut glittered vertical stripe CS to 3 1/2" x 2 1/2";
2) Cut/Emboss tree shapes from CS using brown and pink dotted papers;
3) Hand cut two birds and one paisley shape from CS;
4) Distress all edges with Antique Linen Distress Ink;
5) Cut the word strips/flower from CS;
6) Using medium trunk & tree top, adhere pearls over pink dots, and also to "o" in Love and flower center;
7) Adhere "love" to paisley "speech bubble";
8) Insert small bird in middle tree top slot and secure with foam tape for dimension;
9) Adhere tree trunk near right edge of ATC, attach tree top with foam tape, adhere word strip near bottom
of ATC, adhere bird at top left edge and adhere speech bubble above birdie!

You will have until Friday, December 17th at midnight to submit your ATC Card, just click the link below to upload you card right here. Thanks for joining us today and Happy Holidays. Check back tomorrow for Heidi's tutorial, she had a blizzard and had no internet so her tutorial is a couple days late but believe me it is well worth the wait.




Thursday, December 9, 2010

Marge's Holiday Creation

Marge has created this fun and festive holiday card, at first glance it is just a Christmas card but if you look real close you notice that the card has a tag that can be used to put on a package.....so creative! Who loves embossing? Doesn't the Swiss Dot embossing folder from Cuttlebug just add such detail to the background of the card. Nest Tags by QuicKutz http://cgi.ebay.com/Quickutz-Lifestyle-Crafts-6-023-Nest-Tags-/220703650201?pt=US_Die_Cutting_Machines_Dies&hash=item3362f67199, photo corners http://cgi.ebay.com/Quickutz-Lifestyle-Crafts-Rev-0093-Photo-Corners-/330502076646?pt=US_Die_Cutting_Machines_Dies&hash=item4cf37578e6 and Cuttlebug Embossing Folders a great selection http://stores.ebay.com/Creating-Everlasting-Memories/Quickutz-Products-/_i.html?_nkw=cuttlebug+embossing+folders&submit=Search&_fsub=13491820&_sid=1518945. Keep checking our blog we have some exciting things that are going to happen over the next couple of weeks.

Sunday, December 5, 2010

Just A Note or Two

Just a reminder that tonight at 11:59pm the Black Friday shopping spree will end so hurry and get all the great deals you can at our web store.

Tuesday December 14th will be our third ATC Challenge so we hope you will come and participate with us. We hope that everyone is enjoying their holiday season with all the beautiful lights, hustle and the bustle but please remember to make time to enjoy your family. God Bless and Happy Holidays. 

Thursday, December 2, 2010

Rita's Ready Set Create


paper: American Crafts "be jolly"
Quick Kutz: "Santa Stop Here" & "Holiday die set (santa)"
Zip Dry by Beacon Adhesives
3D foam squares by 3L
Copic:YR01 Peach Puff
ribbon & button from stash
Tim Holtz distress ink Old Paper
door hanger $1 bin at Michaels


Step 1

adhere paper to door hanger, trim and sand. I use basic grey's precision file set, but sand paper will
work just as well. cut out the center circle, and sand. Now do the flip side of the door hanger. Even
though you won't see that side, beleieve me it will BUG you if you don't finish it as well.


Step 2

Ink around all the edges with distress ink. Add "present" to door hanger.


Step 3

Cut out all pieces of Quick Kutz dies being used. Color any pieces that need to be colored, in my case I
used a copic marker, in "peach puff," for Santa's face.


Step 4
Assemble all pieces as needed, and add to door hanger. Santa has the 3d foam pieces behind him.


Step 5
finishing touches. For this I just added buttons.

Thank you for stopping by for my monthly tutorial come visit me at my blog  http://mycreationsbymy.blogspot.com/


Tuesday, November 23, 2010

Did Someone Say Kits?


For a complete list of kit availability check out the web store at http://stores.ebay.com/Creating-Everlasting-Memories, look for your favorite designers name and you are just a click away from getting everything you need to create any of the kits listed above.

From our house to your's we at Creating Everlasting Memories would like to wish you and your families a wonderful Thanksgiving, please remember to keep those who are less fortunate in your prayers. God Bless.

Sunday, November 21, 2010

Mary's Trash To Treasure

Can you guess what this was made out of? Well let me show you how you can turn ordinary trash into beautiful treasure.Today I am going to show you how to create this Cake Gift Tin out of things you might already have around the house.

To start I used a 4 oz. can green chili can, frozen orange juice lid, Cuttlebug dots embossing folder,  Spellbinders Eyelet Circle die # 5, Standard Circles LG die # 4 & 5, Prima Pink Roses, white & pink cardstock.

First remove the lid from the frozen orange juice and label from the green chili can.  Wash. 
To make pattern for can, wrap cardstock around can.  Hold.  Trace top and bottom edge with pencil.  Mark for length.  Cut bottom edge.  On top edge, cut 1/8” above traced line.  (This allows for lid to fit on top).  Copy onto cardboard for permanent pattern.


       Emboss cutout.  Flip around and line up last row of dots.  Emboss again.

Cut two Standard Circles die #5. One from die #4. All from white cardstock.
Cut two Eyelet Circle die # 3 from pink cardstock.
Emboss smallest circle with Cuttlebug dots.
Adhere one large white circle to the bottom of pick Eyelet circle. Repeat.
Add small dot white circle to one layered circle. Adhere to flat side of frozen orange juice lid.

Thursday, November 18, 2010

Black Friday Extravaganza

THE BIGGEST, THE BESTEST, THE ONLY EBAY

"BLACK FRIDAY"
SALE WORTH VISITING

DISCOUNTS SO HIGH, YOU DON'T WANT TO MISS IT!!!

Starts: November 26th 12:01am
Ends: December 5th 11:59pm


EARLY BIRD DEALS
November 26th 12:01am - 11:59pm


(There Will Be Some SPECIAL SPECIAL Pricing During These Hours)

Tuesday, November 16, 2010

November ATC Tuesday Winner Is......

I wanted to thank our followers who participated in this months ATC Tuesday, the design team voted and the winner is Christy. Congratulations Christy please email stampnterre@cox.net with your mailing address. This was a wonderful ATC month and I look forward to even more participants as we grow, thank you and have a wonderul day.

Sunday, November 14, 2010

Heidi’s How’d She Do That? Tips, Tricks & Techniques

Crepe Paper Flowers and Glimmer Mist—You Design It!

Good morning! I hope you are having a wonderful and relaxing weekend. Today I will be sharing with you how to design and create your own crepe paper flowers and you will get to customize them choosing the colors you would like.

To start you will need white crepe paper, this can be found in the party section at most discount stores and you will also need a couple colors of your favorite Glimmer Mist by Tattered Angels. I wanted to create some flowers with a pink/coral look so I used Tutti Fruitti, Cotton Candy (Chalk), Tiger Lily and Iridescent Gold.

I lightly misted the crepe paper starting with Tutti Fruitti, then Cotton Candy and lastly with Tiger Lily. You want to have a good covering but be careful not to saturate the crepe paper.


Next carefully dry the crepe paper with a heat tool.


Next you will need two circle punches a large and smaller one. I used a 1" and 1-1/4" punches.

Cover a piece of cardstock in a complimentary color with your favorite adhesive. I used Adhesive Sheets from SCRAPBOOK ADHESIVES By 3L™. Punch out 2 large circles and 1 small circle. If you don’t have adhesive sheets you can also used your favorite liquid adhesive but punch you circles first and then apply the liquid adhesive.

Adhere the crape paper around the circle folding the paper and crimping it just like you would make a fan fold. Continue until you have went all the way around the circle.

This is what your two pieces will look like.

Free hand trim around the edges to create a basic flower shape.


Next layer the two flower pieces and scrunch the flower into shape. I used a 3D Foam Square to layer the two pieces.

To create your second flower take a piece of the crepe paper (12") and roll it up as shown in the photo. Then start in the center of the circle winding the crepe paper around until the circle is completely covers and trim.

Lightly mist both flowers with Iridescent Gold Glimmer Mist and heat set.


On the smaller flower I also applied Chandelier Glimmer Glam to add a little more sparkle.

Here is a close up of both flowers. I added a pearl brad to the larger one and prima pearls to the smaller one.

Supplies

Paper: White Crepe Paper, Cardstock

Accessories: Tattered Angels Tutti Fruitti, Cotton Candy (Chalk), Tiger Lily and Iridescent Gold Glimmer Mist, Chandelier Glimmer Glam; Prima Pearls; Pearl Brad; Heat Tool; SCRAPBOOK ADHESIVES By 3L" Adhesive Sheets, 3D Foam Squares; Circle Punches

Thank you so much for stopping by today! I hope you enjoyed the flower tutorial and if you create and any crepe paper flower we would love to see them!

Hugs & Smiles,

Heidi

My Blog: http://embellished-dreams.blogspot.com/

Tuesday, November 9, 2010

ATC TUESDAY


Materials:
Karen Foster - Snowflake Brads
Foam Squares

Instructions:

1) Cut creative scrap to 2 1/2 x 3 1/2
2) Stamp "Let it Snow" in the upper right corner with black ink.
3) Embellish with brads and pearls
4) Use diamond stickles to add shimmer to creative scraps.
5) Cut raffle tickets and pop up with foam squares

Materials:
JustRite 15-pt. Times New Roman Alpha stamps

Instructions:
1) Cut glittered snowflake CS to 2 1/2" x 3 1/2"
2) Round corners with corner rounder
3) Cut/Emboss die shapes from CS -- I cut sign post & North Pole sign twice/glued together for strength
4) Stamp signs (leaving space for spinner piece) & distress edges with Vintage Photo ink
5) Attach game spinner with brad & add brad to sign post
6) Attach workshop sign to larger backing piece with foam tape & glue to sigh post
7) Attach sign post & North Pole sign with with foam tape
8) Add glue dot to workshop sign for stability


Materials:
QuicKutz - Jolly mini ornament
Prima "e" - Rhinestone Bling
Pop Dots
Ribbon

Instructions:
1). Cut stripe paper 2 1/2 x 3 1/2
2). Cut Merry Christmas paper with birds 2 1/2 inch square.
3). Trim bottom edge in a wave pattern using scissors and adhere to stripe paper.
4). Cut out an additional "Merry" and adhere with pop dots.
5). Using gold stickles embellish the trimmed wave edge of pattern paper.
6). Die cut "jolly" mini ornament, add ribbon through loop and adhere to card with pop dots.
7). Embellish "burst" on the ornament with gold stickles.
8). Add Bling for the finishing touches.


Materials:
Paper: American Crafts Designer Paper; Crafty Secrets Christmas Creative Scraps
Ink: Ranger Antique Linen Distress Ink

Accessories: Tattered Angels Red Velvet Glimmer Mist, Chandelier Glimmer Glam; Prima Red Rose, E Line Pearls (green); SCRAPBOOK ADHESIVES By 3L™ My Stik™; Beacon Adhesives Zip Dry; Vintage Lace

Instructions

1) Cut designer paper 2-1/2" x 3-1/2", Cut Crafty Secrets image and ink both pieces with Antique Linen Distress Ink.
2) Apply Chandelier Glimmer Glam to the white fur on the Crafty Secrets image and carefully heat set with heat tool.
3).Darken Prima rose by applying Red Velvet Glimmer Mist and heat set with heat tool.
4).Adhere Crafty Secrets image to designer paper using My Stik™. Add rose and lace using Zip Dry and for
the finishing touch add the green pearls.


Materials:

The Paper Company
Spellbinder's: Assorted Leaves S4-076
QuicKutz: Autumn Twigs
Cuttlebug: Pumpkin Embossing Folder
Tim Holtz Distress Ink: Vintage Photo
Stampin' Up: Give Thanks

Instructions:
1). Cut cardstock 2 1/2" x 3 1/2". Emboss with Pumpkin Folder. Sand.
2). Cut/Emboss leaves. Sand.
3). Cut nuts. Sand.
4). Stamp. Layer with mount foam.
5). Adhere all pieces.

Thank you all for stopping by our 2nd ATC Tuesday, we hope you have enjoyed what our Design Team has created. To be eligible to win a prize this month submit one ATC Card using the link below, you will have until Friday, November 12 at midnight to submit your entry. Our DT will be voting on a winner. Good Luck and thank you for playing alot.