Sunday, May 29, 2011

Lynette Neus

#1 You’ll need an embossing folder (this is Leaves from Lifestyle Crafts/Quickutz), a brayer, and ink.

#2 Brayer ink on the bottom inside of the embossing folder. (This is the flatter side that the leaves get pressed down in to.)

#3 Emboss with your machine, and this is what it looks like.


#4 The finished card. The ink I used is Kiwi Kiss from Stampin’ Up! I also used Kiwi Kiss cardstock for my matting. The sentiment is from Studio G, stamped in Kiwi Kiss. I cut it with a Lifestyles doodle frames die #DT0095. The outer frame is also Kiwi Kiss. I used Dragonfly #KS0615 die to cut the body of the dragonfly from black cardstock and the wings from vellum.


Friday, May 27, 2011

Vicki Boddicker

The inspiration for this card was a nephew and his wife who are expecting their first baby in May. I embossed the front of a light blue card stock with a Crafts Too embossing folder. It was perfect to use along with the Quickutz REV-0106-S Baby Bottle & Pacifier die set. It was a simple card to put together and will be used for the baby shower.

Wednesday, May 25, 2011

Ute Thenert – Featured Designer Challenge

A Vintage Card for Mother's Day!  That would be great!  And, holding the paper of K&C Company in my hands, I knew which papers and dies I would use for this card.  I used all the dies, by Quickutz Lifestyle Crafts; Nest Round Tags; Clothes Pin, Pin Cushion, Postcard, Crow, Label, and Journal.   I distressed and arranged all of them on a basic card.  Because it is for Mother's Day I used two typical things for a mom; a clothes pin and a pin cushion with needles.  I added prima flower with swirls on the left corner.

Tuesday, May 24, 2011

Sunday, May 22, 2011

My Mind's Eye


Designed by Karla Dickerson

Saturday, May 21, 2011

Vicki Boddicker

At this time of year some areas of the country are actually beginning to see blossoms on decorative trees and the birds are singing and building their nests. This die set seemed to be the perfect one to use right now. All of the paper is from a 6 x 6 Basic Grey Bittersweet pad. The tree for this die is actually a 12 inch border die Trees and Birds (CC-BDR-046). For a card I used just the top portion of the die and cut three birds to perch on the branches. Using a small flower design, I punched 10 flowers and used two to make each flower. By cupping the flower with a tool, I gave the flowers some dimension and then added some Crystal Glitter Glue in the centers. The sentiment is a stamp from Hero Arts.

Friday, May 20, 2011

Marge Robertson


With Lifestyle Crafts A2 Collection, I created an invitation to shower an elderly relative with cards for her 95th Birthday. For their ease, I included her peel-off address label.
Using a word processor type the wording, leaving a 1 ½” space to add label. This card back can be set up in landscape mode to print 4 on each CS sheet, then cut apart, leaving four 4 ¼” x 5 ½” card backs. Prepare labels, cut apart, leaving backing intact & use a simple glue dot to attach to your card’s open area. With My Mind’s Eye Lush (blue) patterned CS, die cut the window piece, folding the gatefold window at edges. I stamped “Birthday Wishes” & die cut it using one of six included embellishment dies, centered it on my window opening, gluing just the left half so it will open! I need a lot of these, so chose to keep it very simple by merely dotting the “i” in wishes with a tiny Lush sequin. For a beautiful finish, line your envelope in coordinating CS using the envelope liner die in this fabulous set.

Thursday, May 19, 2011

Ute Thenert – Featured Designer Challenge

I used a wooden House Mouse Stamp and the Spool die by Lifestyle Crafts.  The motifs were suitable for each other and it was perfect for another Mothers Day Vintage Card.

Wednesday, May 18, 2011

Mary Pfaff

The photo is three different cards made for the Mini Collection set. Creating mini cards can be just as beautiful as the standard cards.
To change up the design using the Mini Collection by Lifestyle Crafts, I cut the card from black white core card stock. Embossed using Cuttlebug Swirl. Sanded. I layered a 1" strip across with black sheer ribbon on top. Added three cut/embossed squares from the set, which I sanded. Added pearls.
Here is another little card using Lifestyle Crafts Mini Collection. I stamped a card using “Thanks” by Hero Arts by stamping the words all over the white card. I added color to the edge. I used a cotton ball to soften the white on card. I die cut the belly band and sanded. Layered and added “Thanks”.
The Mini Collection by Lifestyle Crafts is a perfect way to create little cards and envelope inserts to attach to gifts. I cut/embossed the pop-up door with deep pink white core card stock. I embossed the doors with Cuttlebugs “Dots” folder. Sanded and folded accordian style. Adhered to card. Added white dots across top and bottom with white gel pen. Stamped Hero Arts “Hello” with Tsukineko black ink onto pick cardstock. Cut/embossed with tiny die. Sand. Layer onto Prima floweres in center.

Thursday, May 12, 2011

Marge Robertson – Featured Designer Challenge

Die cut sewing machine (REV-0211-S) from cream & silver CS;
Die cut pin cushion (KS-0954) from red & green CS & additional stem piece from clear plastic (to strengthen stem);
Stamp sentiment (Little Paper Shop {All Occasions}) on stem/tomato pieces; punch tiny hole through stem/plastic backing; add green safety pin & 3 sequin pins to pin cushion, securing with pop dot on back;
Using Tim Holtz Antique Linen Distress Ink, distress sewing machine & card (4 ¼” x 5 ½” cream CS) edges;
 Assemble sewing machine, winding thread around spool (DMC Floss #814);
Cut DP (Cosmo Cricket’s “Material Girl”) to 4” x 5 ¼”, secure to card with double-sided tape 1/4” inside DP edges, then zig-zag stitch with cream thread to card;
Attach sewing machine with pop dots; add Bobbin Ribbon “Tape Measure” to left edge, tying in double knot & fraying edges;
Add sentiment pin cushion with safety pin to knot.


Monday, May 9, 2011

Karla Dickerson – Featured Designer Challenge


Mother’s Day Pop-Up Card and Custom-Sized Gift Box!
The card & box was created by using The Ultimate Crafter’s Companion.  Opposites Attract Cartridge, by Cricut for the wording.   Add a clear Tear Drop to the button and center of Prima flowers.  Adhere with mount foam.

http://www.etsy.com/shop/KarlasCustomCreation

Sunday, May 8, 2011

Lynette Neus - Featured Designer Challenge

Cut flowers with die three times. Sponged ink around edges of flower petals, putting scrap paper under petal to avoid getting ink on card base. Used a sponge dauber to ink flower center. Used Scor- Pal to emboss lattice grid, skipping over petals. Matted with textured red cardstock. Sentiment is from Repeat Impressions, matted, and mounted on foam squares.


Saturday, May 7, 2011

Marge Robertson – Featured Designer Challenge

Using Nesting Hearts (CC-HEARTS-01) cut the next to largest heart once from white CS & 3 from different patterned papers. Form your patchwork heart by hand tearing sections from patterned papers and attach to CS heart. Edge heart with coordinating ink. Cut 3 ¾” square from decorative CS, punch corners with ticket punch & attach to 4 ½” square card, adding coordinating ZVA Creative Pearls at corners. Die cut Nesting Ovals (CC-OVALS-01), stamp sentiment & edge with ink. Attach eyelet & jump ring to ribbon & tie around card front.


Friday, May 6, 2011

Marley van der Heijden – Featured Designer Challenge

This Mother’s Day tag was made for my mother!
I used 2 dies from Nesting Frames, by Quickutz.  I just love those frames!!   Around the tag I punched the loops with the Ribbon Loop combo punch, by Martha Stewart.  This is not only great as a border, but really nice to make as a frame on cards or tags.  The letters  ”MAMA” are made with the amazing Sketchbook Alphabet, by Quickutz.  Love those fun letters and they’re a perfect size for on cards or tags.  Then last, but not least I have used the Butterfly Die, by Quickutz.  I LOVE… no ADORE this die!   Because the body and wings are two separate dies  you can cut them out in different designs.  The wings really pop out!!!

Thursday, May 5, 2011

Mary Pfaff - Featured Designer Challenge

I created this Flower Stand card using Lifestyle Crafts A7 Collection (L-CC-025). I cut the pop-up door using yellow card stock. Turn 90 degrees. Emboss top door with Cuttlebugs Dot folder. Sand front. Score top door from underneath along every other row of dots. Fold to make canopy. Bend wire to allow ½” from card. Cut two, 1 ½” x 3” yellow pieces for flower base. Score every ¼”. Fold. Adhere card together using light blue card stock behind opening. Add clear Tear Drop to center of Prima flowers & adhere with mount foam. Stamp “Happy Mother’s Day”. Cut/Emboss. Spray with Pink Copic marker. Adhere.


Wednesday, May 4, 2011

Ute Thenert – Featured Designer Challenge

I wanted to make a little box for Mother’s Day. 
I used two dies from the Nesting Round Tags, by Quickutz Lifestyle Crafts for each side, made a paper stripe for the ground, the sides and stuck together.  Clear Stamp was mounted with foam pads.
You see… not too difficult…making this is really easy!

Tuesday, May 3, 2011

Vicki Boddicker – Featured Designer Challenge

When I saw the 6 x 6 KaiserCraft English Rose Collection, I knew what I would use for my Mother's Day card. The papers in the pad make it so easy with such lovely coordinating patterns. My card base is 5 1/2 inches x 4 1/4 inches. I chose the dp for the background because of the lovely flowers in the corner and cut it to fit the card front. Using the Quickutz Nesting Diamond set of dies, I cut the largest triangle from the green. The top layer is cut from a dp that has a very subtle flourish pattern on it. I stamped the sentiment from Paper Inspirations on it with Versa Mark and embossed it with Egyptian Gold embossing powder. Clean and simple, but I think very pretty.


Monday, May 2, 2011

Wendy Mind – Featured Designer Challenge

Supplies:
Cut out in the Flat Broke Cardstock
Lifestyle Crafts Nesting Circles (L-CC-001)
Lifestyle Crafts Nesting Scallops (L-CC-005)
Lifestyle Crafts Blossoms (DC0073)
Bazzill Bling October cardstock
Bazzill Bling Flat Broke cardstock
Bazzill Bling Glass Slipper cardstock
Sparkly gems

Step 1
Cut out in the Flat Broke Cardstock
Two 5”, two 4”, two 3” circles
3 strips in the following sizes,
(12” x 2”), (12” x 1 and 7/8”) and (12” x 1 and 6/8”)
Cut out in the October Cardstock
Approx. 25 each e of the 3rd smallest blossom
Cut out in the Glass Slipper cardstock
One  5” scallop
2 piece of 12” x 1cm strips

Step 2
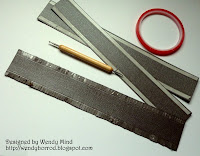
On each of the 3 12” card strips score 1cm down ach side
Stick double sided tape on both edges of each of the 3          
strips (it is important to do this before you start fringing
the cardstock.
Trim at small intervals on each edge of all 3 strips so you
have a‘fringed’ look.

Step 3
Start to attach the strips to each of the circles by bending the card round
to fit.  The widest width strip will be for the largest circle etc.


Step 4
Once you have attached the card strips to the bottom circle, the top
circle  will fit on nicely.


Step 5
Once all 3 layers of the cake have been put together attach them
ontop of each other with glue and then attach to the scallop.
Attach theGlass slipper strips of card around the bottom of each
layer of the cake.


Step 6
To finish pinch each of the petals of the small blossoms, attach them
to the cake and add a sparkly.
To make the flower on the top of the cake, layer 3 of the smallest
blossoms on top of each other and then adhere to the cake.