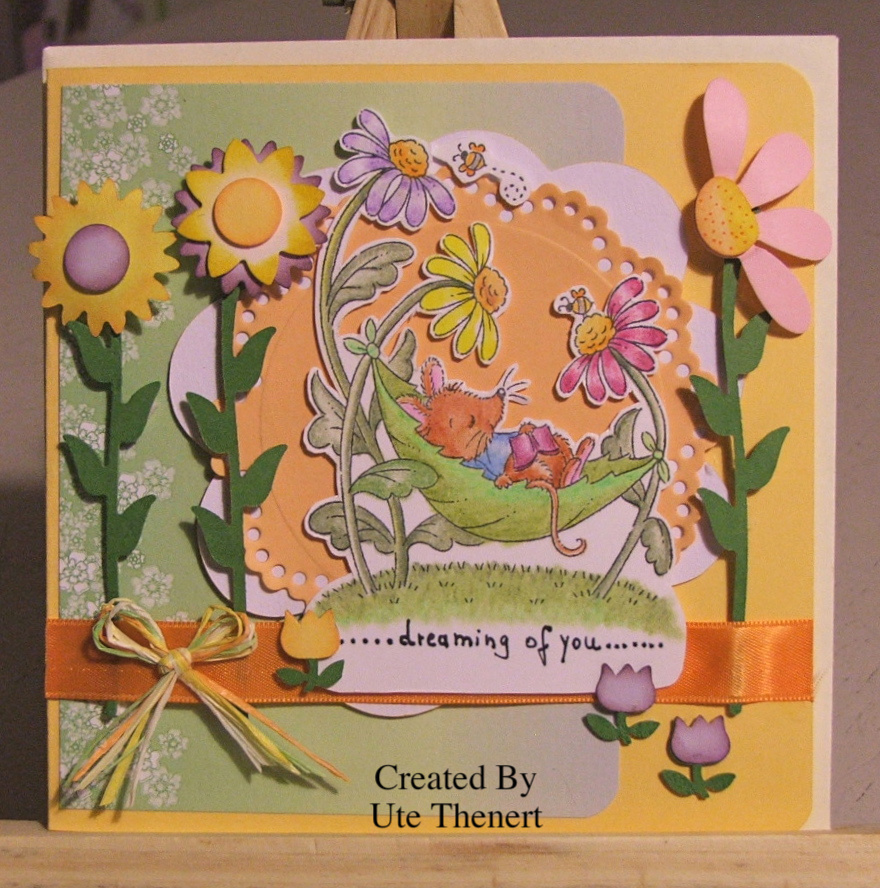
Please welcome CMIT's Guest Designer.......Ute Thenert
Stampavie WDS-542 "House In Hammock" Clear Stamp
RS-0013 Quickutz Daisy Profile Die
Rev-0250 Sunflowers Die
IT IS CHA TIME AGAIN and you know what that means..........HUGE BLOW OUT SALES so make sure to check out our Ebay Store at this link for all the HUGE SPECIALS http://stores.ebay.com/Creating-Everlasting-Memories
Wednesday, January 26, 2011
Monday, January 24, 2011
Create With Mary
Today’s tutorial for Creating Memories In Time is a Lantern Garland designed by Mary Pfaff.
Supplies:
QuicKutz – Lanterns (REV-0158-S)
Cuttlebug – Dots Embossing Folder
Spellbinders – Flower Silhouette Impressabilities (I2-1015)
Fair Isle Pendants (S4-270)
The Paper Company – Clear Translucent Sheets (5)
Deep Red Cardstock
Clear 35 Miniature Christmas Lights
Michaels - 5” Berry Garland
Beacon – Zip Dry Paper Glue
Xyron – Create A Sticker (Model 150)
Lay two pieces translucent sheets on Lantern die cut. Cut out Lanterns. Make 17 of one Lantern shape and 18 of the other.
Emboss round Lantern shape with Flower Silhouette Impressability.
Emboss the other with Cuttlebug Dots Embossing Folder. Glue inside edges together of each Lantern with Zip Dry glue. Let Dry.
Twist Berry Garland around miniature light strand.
Supplies:
QuicKutz – Lanterns (REV-0158-S)
Cuttlebug – Dots Embossing Folder
Spellbinders – Flower Silhouette Impressabilities (I2-1015)
Fair Isle Pendants (S4-270)
The Paper Company – Clear Translucent Sheets (5)
Deep Red Cardstock
Clear 35 Miniature Christmas Lights
Michaels - 5” Berry Garland
Beacon – Zip Dry Paper Glue
Xyron – Create A Sticker (Model 150)
Lay two pieces translucent sheets on Lantern die cut. Cut out Lanterns. Make 17 of one Lantern shape and 18 of the other.
Emboss round Lantern shape with Flower Silhouette Impressability.
Emboss the other with Cuttlebug Dots Embossing Folder. Glue inside edges together of each Lantern with Zip Dry glue. Let Dry.
Twist Berry Garland around miniature light strand.
When dry, slip Lanterns over mini light bulbs on Garland. Alternating Lantern shapes.
Cut Faire Isle Charm. Fold in half. Open and run through Xyron. Make 35.
Cut in half. Place one on top front of Lantern and one one the back. Press together to stick.
Thanks for stopping by.
Tuesday, January 18, 2011
Marge's Monday Card Corner
Papers: My Minds Eye "Love Nest" 12" x 12" Paper Pad
Dies: QuicKutz "Pennant”
Ink: Tim Holtz Antique Linen Distress Ink
Embellishments: ZVA Creative Self-Adhesive Pearls
Additional products:
Paper: Cream CS (for card base)
Embellishments: Hobby Lobby Cream lace (by-the-yard);
Heart brads (from stash); DMC Embroidery Thread;
Sizzlits Round-a-Bout alpha dies
Tape: 1/8” double-sided tape
Instructions:
1) Cut cream CS to 8” x 9 ¼” and pink DP to 4” x 9 ¼” (card fits a business envelope);
2) Score CS at 4” and fold card;
3) Adhere pink CS to card front;
4) Die cut inside/outside Pennant shapes from various DPs;
5) Distress all edges with Antique Linen Distress Ink;
6) Adhere pennant shapes together;
7) Add lace (sew or adhere with narrow double-sided tape) and pearls to pennants;
8) Prepare and glue down LOVE letters;
9) Score, fold, glue pennant tabs in half;
10) Thread 6-strand embroidery floss through tabs;
11) Secure pennant to card front. (Note: I punched holes at top corners 3/8” in from top/side edges and tied my thread through my punched holes, as my heart brad tops pop on/off, and then secured them with a glue dot.)
Sunday, January 16, 2011
A Little Creativity from Marge!
Here's what Marge has been creating, I think she has vacation in the back of her mind as she has created a few cards with travel in mind. What do you think?
Thanks Marge for these clever cards, it will make us all want to go on vacation. Stay tuned as Marge's Card Corner is right around the corner.
Tuesday, January 11, 2011
ATC TUESDAY - VALENTINE'S
It's ATC Tuesday and here is what our Design Team has created for you:
Papers: My Minds Eye "Love Nest" 12" x 12" Paper Pad
Dies: QuicKutz "Pennant and "Love Birds" (hearts) dies
Ink: Tim Holtz Antique Linen Distress Ink
Embellishments: ZVA Creative Self-Adhesive Pearls
Additional products:
Papers: Cream CS (for ATC base)
Stamps: JustRite 15-pt. Times New Roman Alpha
Ink: VersaColor's Burgundy pigment ink
Embellishments: Hobby Lobby Cream lace (by-the-yard) and Lt. pink Decorative Trim (roll)
Tape: 1/8” double-sided tape
Instructions:
1) Cut cream CS and pink CS to 3 1/2" x 2 1/2";
2) Adhere pink CS to cream CS base;
3) Die cut inside/outside Pennant shapes from striped CS;
4) Die cut both heart shapes from Love Bird die from CS;
5) Distress all CS edges with Antique Linen Distress Ink;
6) Adhere die cuts shapes together and then adhere to card at angle as shown, cutting off tabs at top edge;
7) Use 1/8” double-sided tape to adhere cream lace and pink decorative trims;
8) Stamp sentiment;
9) Apply self-adhesive pearls at lower left corner.
Materials:
Strawberry Quickutz heart die DD0031
I heart you Quickutz die DS0033
Cuttlebug heart folder
Martha Stewart ribbon
Red cardstock
Black cardstock
Pink cardstock
Pop Dots
Instructions:
1. Cut the strawberry out of red cardstock
2, Cut the stem and the “I heart you” from pink cardstock.
3. Glue the strawberry on black cardstock and cut out.
4. Put strawberry and I heart you on pop dots.
5. Cut red, pink and white layers.
6. Emboss white layer with Cuttlebug hearts folder.
7. Add ribbon to white layer.
8. Glue layers together.
9. Remove sticky from pop dots and add strawberry and sentiment to white layer.
supplies:
Pink mulberry paper
Brenda Walton "sweet talk postage stamp" paper
Zip Dry by Beacon Adhesives
Lace
Prima 'e' pearls
Flower rhinestone
Ribbon
Liquid glass CTMH
directions:
1. Cut mulberry paper to 2 1/2 x 3 1/2
2. Place ribbon between layers
3. Adhere "postage stamp" with Zip Dry
4. Add lace, pearls and rhinestone
5. Once everything is assembled add liquid glass to "Lovey" and heart
Designed by: Marge
Papers: My Minds Eye "Love Nest" 12" x 12" Paper Pad
Dies: QuicKutz "Pennant and "Love Birds" (hearts) dies
Ink: Tim Holtz Antique Linen Distress Ink
Embellishments: ZVA Creative Self-Adhesive Pearls
Additional products:
Papers: Cream CS (for ATC base)
Stamps: JustRite 15-pt. Times New Roman Alpha
Ink: VersaColor's Burgundy pigment ink
Embellishments: Hobby Lobby Cream lace (by-the-yard) and Lt. pink Decorative Trim (roll)
Tape: 1/8” double-sided tape
Instructions:
1) Cut cream CS and pink CS to 3 1/2" x 2 1/2";
2) Adhere pink CS to cream CS base;
3) Die cut inside/outside Pennant shapes from striped CS;
4) Die cut both heart shapes from Love Bird die from CS;
5) Distress all CS edges with Antique Linen Distress Ink;
6) Adhere die cuts shapes together and then adhere to card at angle as shown, cutting off tabs at top edge;
7) Use 1/8” double-sided tape to adhere cream lace and pink decorative trims;
8) Stamp sentiment;
9) Apply self-adhesive pearls at lower left corner.
Designed by Lynette
Materials:
Strawberry Quickutz heart die DD0031
I heart you Quickutz die DS0033
Cuttlebug heart folder
Martha Stewart ribbon
Red cardstock
Black cardstock
Pink cardstock
Pop Dots
Instructions:
1. Cut the strawberry out of red cardstock
2, Cut the stem and the “I heart you” from pink cardstock.
3. Glue the strawberry on black cardstock and cut out.
4. Put strawberry and I heart you on pop dots.
5. Cut red, pink and white layers.
6. Emboss white layer with Cuttlebug hearts folder.
7. Add ribbon to white layer.
8. Glue layers together.
9. Remove sticky from pop dots and add strawberry and sentiment to white layer.
Designed by: Margarita
supplies:
Pink mulberry paper
Brenda Walton "sweet talk postage stamp" paper
Zip Dry by Beacon Adhesives
Lace
Prima 'e' pearls
Flower rhinestone
Ribbon
Liquid glass CTMH
directions:
1. Cut mulberry paper to 2 1/2 x 3 1/2
2. Place ribbon between layers
3. Adhere "postage stamp" with Zip Dry
4. Add lace, pearls and rhinestone
5. Once everything is assembled add liquid glass to "Lovey" and heart
Designed by: Mary
Supplies:
Spellbinders - Classic Ovals SM, Die#3, LG, die #2
The Paper Company - Deep Red
Polka Dot Paper
May Arts Sheer Ribbon
Queen & Co. - Classy red Pearls
Thank you for stopping by and joining our designers for another wonderful ATC Tuesday, we hope you will play along.
Saturday, January 8, 2011
Valentine's Day Is Just Around the Corner!!!
Creating Everlasting Memories your one stop QuicKutz dealer, here's what is new as well as some of the best deals in town on all of your crafting needs.
looped heart dd0028
heart photo corners dd0029
strawberry heart dd0031
i heart you ds0033
heart paper clip dp0034
three-in-one heart dr0035
heart and arrow dr0036
heart clips dr0038
love letters dr0040
conversation hearts dc0041
nesting hearts dc0042
nesting scalloped hearts dc0043
mini valentine dc0044
xoxo dc0045
mini takeout box dc0048
heart accordion dc0049
love pop-ups dc0051
banners & arrows dc0046 .
looped heart dd0028
heart photo corners dd0029
strawberry heart dd0031
i heart you ds0033
heart paper clip dp0034
three-in-one heart dr0035
heart and arrow dr0036
heart clips dr0038
love letters dr0040
conversation hearts dc0041
nesting hearts dc0042
nesting scalloped hearts dc0043
mini valentine dc0044
xoxo dc0045
mini takeout box dc0048
heart accordion dc0049
treat bags dc0050
love pop-ups dc0051
banners & arrows dc0046 .
CMIT Welcomes New Design Team Member
Please give a warm welcome to our newest design team member Marley Van Der Heijden!
Welcome Marley! You can check out Marley's creativity at her blog http://www.scrapping-marley.blogspot.com/
Wednesday, January 5, 2011
A Few Creations from Lynette
Happy Wednesday Everyone,
Today we have a few creations from Lynette, you are going to love her creativity I know we do.
Thank you Lynette for sharing some of your beautiful creations, we can't wait to see what you create next.
Just a reminder, join us right here for another ATC Tuesday on January11th.
Sunday, January 2, 2011
Vicki's Creations
Happy New Year Everyone!
Today we have a couple of cards created by our Design Team member Vicki, thank you Vicki for sharing your creativity with us.
Make sure to check out the Christmas Blowout sale right here http://stores.ebay.com/Creating-Everlasting-Memories/50-75-OFF-CHRISTMAS-/_i.html?_fsub=2511111015&_sid=1518945&_trksid=p4634.c0.m322 the price is right and what a better deal to spend your Christmas money...more bang for your buck.
Thanks again Vicki for your beautiful cards, we look forward to seeing more of what you create.
Today we have a couple of cards created by our Design Team member Vicki, thank you Vicki for sharing your creativity with us.
Thanks again Vicki for your beautiful cards, we look forward to seeing more of what you create.
Monday, December 27, 2010
Mary's Trash To Treasure
Mary's Trash To Treasure Tutorial
Heart Pillow
Supplies:
Spellbinders - Classic Scalloped Heart S4-137 #6
QuicKutz - Pennant
Three Bugs In A Rug - Sugar & Spice Rub On #rub-223
The Paper Company - Cream Cardstock
Red Felt
Cream Ribbon (Not sure what brand from Teresa)
Cream Thread 7amp; needle
6 Cotton Balls (recycled)
Bamboo Skewer
Directions:
Cut two scalloped hearts from red felt. Hand stitch around edge. Stuff with cotton balls. Inserted 10" folded ribbon. Stitch close.
Cut Pennant from red felt. Cut cardstock. Rub on "I Love You...". Glue to red felt Pennant. Glue to Bamboo Skewer. Insert skewer into pillow.
Tie bow. Glue to front of red Heart Pillow.
Thank you for stopping by this month's Trash To Treasure tutorial, we here at CMIT hope your holiday was merry, we wish you a bright and safe New Year.
Monday, December 20, 2010
Marge's Monday Card Corner
White, turquoise, brown & beige CS
My Mind’s Eye: Where the Heart Is DP (BG, tree trunks, tree tops)
QuicKutz Dies: (Trees, House & Mini Van -- hub cap only for wreath!)
FlowerSoft
ZVA Creative Self-Adhesive Pearls
May Arts Satin Reverse Ribbon 3/8”
Tim Holtz Distress Ink (Antique Linen)
Copic Marker (Y11 Pale Yellow)
Q-Tip
Inkadinkado stamp
Directions:
Using a white 5” x 7” card, cover the front with turquoise CS
Cut BG DP 6 ¾” x 4 ¾”, distress edges with Antique Linen ink, glue to card front
Die cut house, trees and mini van’s hub cap (for wreath) from CS in colors shown
Distress pieces with Antique Linen (except wreath)
Using Copic Marker, color large window and glue small window down and color behind it for “light”
Add Pearls to window ledge & for door knob
Using FlowerSoft glue cover bush cut from house die and “wreath” cut from Mini Van die; cover with FlowerSoft
Assemble house as shown, add “smoke” to chimney by pulling tip off Q-Tip
Attach house/trees in place
Stamp sentiment
Add Ribbon “sidewalk” across bottom of card
Wednesday, December 15, 2010
HEIDI'S HOW'D SHE DO THAT? TIPS, TRICKS AND TECHINIQUES
Quick and Easy Vintage Christmas Ornaments
Hello! Are you surviving all the hustle and bustle of the holidays? I can’t believe there are only 13shopping days left and then it will be Christmas!! Well, I don’t know about you but I am always looking for those quick and easy gifts when you need just a little something.
Today, I am going to share with you how you can create these very quick and easy vintage Christmas ornaments.
I selected images from the Crafty Secrets Merry Christmas Creative Scraps. I love the sheets of Creative Scraps from Crafty Secrets; they are filled with so many wonderful images.
Next, I created a framed edge with buttons. I have a jar full of white and ivory buttons and I used different shapes and sizes to create the frames. I used 3-in-1 Advanced Craft Glue from Beacon Adhesives to adhere the buttons.
I used a paper piercer to create holes and then threaded a piece of wire.
I twisted the wire to create hangers for the ornaments. After I had the hangers on I brushed over the buttons with glue and added the chunky glitter.
For an embellishment I punched out snowflakes using the Martha Stewart snowflake punch, inked them with Antique Linen Distress Ink from Ranger and added a Prima rhinestone in the center.
I made some crinkled seam binding using Waterfall and Iridescent Gold Glimmer Mist from Tattered Angels. To create the crinkle seam binding I used White Snug Hug Seam Binding and lightly misted it with the Glimmer Mist, then scrunch into a ball, put the ball into a baggie and tie it up tight with a twist tie and leave it sit over night. When you take the seam binding out the next day it might still be a little damp so fluff it up and set aside to air dry or heat set with a heat tool. Use the crinkled seam binding just as you would ribbon.
Supplies
Paper: Crafty Secrets Merry Christmas Creative Scraps; WorldWin White Cardstock
Ink: Ranger Antique Linen Distress Ink
Punches: Martha Stewart Snowflake Punch
Accessories: Tattered Angels Waterfall, Iridescent Gold Glimmer Mist; Prima e. Rhinestones; Snug Hug Seam Binding; SCRAPBOOK ADHESVIES By 3L White 3D Foam Squares; Sakura Clear Star Gelly Roll Glitter Pen; Beacon Adhesives 3-in-1 Advanced Craft Glue, Gem Tac; Paper Piercer, Wire, Clear Chunky Glitter
Thank you so much for stopping by today! I hope you are staying warm and having a wonderful weekend!
Hugs & Smiles,
Heidi
My Blog: http://embellished-dreams.blogspot.com/
Hello! Are you surviving all the hustle and bustle of the holidays? I can’t believe there are only 13shopping days left and then it will be Christmas!! Well, I don’t know about you but I am always looking for those quick and easy gifts when you need just a little something.
Today, I am going to share with you how you can create these very quick and easy vintage Christmas ornaments.
I selected images from the Crafty Secrets Merry Christmas Creative Scraps. I love the sheets of Creative Scraps from Crafty Secrets; they are filled with so many wonderful images.
Next, I created a framed edge with buttons. I have a jar full of white and ivory buttons and I used different shapes and sizes to create the frames. I used 3-in-1 Advanced Craft Glue from Beacon Adhesives to adhere the buttons.
I used a paper piercer to create holes and then threaded a piece of wire.
I twisted the wire to create hangers for the ornaments. After I had the hangers on I brushed over the buttons with glue and added the chunky glitter.
For an embellishment I punched out snowflakes using the Martha Stewart snowflake punch, inked them with Antique Linen Distress Ink from Ranger and added a Prima rhinestone in the center.
I made some crinkled seam binding using Waterfall and Iridescent Gold Glimmer Mist from Tattered Angels. To create the crinkle seam binding I used White Snug Hug Seam Binding and lightly misted it with the Glimmer Mist, then scrunch into a ball, put the ball into a baggie and tie it up tight with a twist tie and leave it sit over night. When you take the seam binding out the next day it might still be a little damp so fluff it up and set aside to air dry or heat set with a heat tool. Use the crinkled seam binding just as you would ribbon.
Supplies
Paper: Crafty Secrets Merry Christmas Creative Scraps; WorldWin White Cardstock
Ink: Ranger Antique Linen Distress Ink
Punches: Martha Stewart Snowflake Punch
Accessories: Tattered Angels Waterfall, Iridescent Gold Glimmer Mist; Prima e. Rhinestones; Snug Hug Seam Binding; SCRAPBOOK ADHESVIES By 3L White 3D Foam Squares; Sakura Clear Star Gelly Roll Glitter Pen; Beacon Adhesives 3-in-1 Advanced Craft Glue, Gem Tac; Paper Piercer, Wire, Clear Chunky Glitter
Thank you so much for stopping by today! I hope you are staying warm and having a wonderful weekend!
Hugs & Smiles,
Heidi
My Blog: http://embellished-dreams.blogspot.com/
Subscribe to:
Posts (Atom)