
Sunday, October 16, 2011
Sabine Schroll

Saturday, October 15, 2011
Mary Pfaff

It’s Time To… Journal
Supplies:
Lifestyle Crafts ~ Enjoy Mini Alphabet Set
The Paper Company ~ Brown card stock
DCWV ~ Clock Patterned Paper
Corrugated Cardboard
Fiskars Leather Embossing Plate
Ranger ~ Tim Holtz Distress Ink (Vintage Photo)
Copics ~ E39, E49
Teresa Collins ~ Blingage: Carol’s Clocks, Collin’s Keys
Fabric Barn ~ ¼” Brown Grossgrain Ribbon
Composition Book
School Brads ~ Copper
Adhesives
Small chain
Magnet
Hole Punch
Instructions:
Measure and cut patterned paper to fit front & back of book. Adhere.
Measure and cut brown cardstock to fit edge of book. Emboss. Rub with ink. Adhere. Make magnet closure. Adhere.
Cut out letters. Punch three dots. Arrange and adhere. Adhere ribbon around edge. Color brads with Copic E49. Adhere to corners.
Airbrush clocks, keys and chain with E39. Add ribbon. Adhere.
Supplies:
Li
The Paper Company ~ Brown card stock
DCWV ~ Clock Patterned Paper
Corrugated Cardboard
Fiskars Leather Embossing Plate
Ranger ~ Tim Holtz Distress Ink (Vintage Photo)
Copics ~ E39, E49
Teresa Collins ~ Blingage: Carol’s Clocks, Collin’s Keys
Fabric Barn ~ ¼” Brown Grossgrain Ribbon
Composition Book
School Brads ~ Copper
Adhesives
Sma
Magnet
Hole Punch
Instructions:
Measure and cut brown cardstock to fit edge of book. Emboss. Rub with ink. Adhere. Make magnet closure. Adhere.
Cut out letters. Punch three dots. Arrange and adhere. Adhere ribbon around edge. Color brads with Copic E49. Adhere to corners.
Airbrush clocks, keys and chain with E39. Add ribbon. Adhere.
Thursday, October 13, 2011
Jaimie Ramsey

Cardbpoard box bought at dollar store
Prima Flower
American CraftsThickers glitter "M"
Metal flourishes
White ribbon
Pink Polka dot paper
Pink striped paper
double sided tape
Tuesday, October 11, 2011
Thanksgiving - Featured Designer Challenge by Wendy Mind

Products used:
Letterpress Thicket Plate (013), Dark Brown Ink (INK-01), Tattered Angels Glimmer Mists (Olive Vine, Walnut Gold, Candy Apple), Lifestyle Crafts Nesting Eyelet Circles (DC0153)
This little pail was made to give a little gift at Thanksgiving time.
I took a strip of card and put it through the Letterpress machine using the Thicket plate. Once this was dry, I spritzed with 3 different colors of glimmer mists. Between each color, I set the mist using a heat tool.
I then inserted the strip of card into the pail and finished off with a little decoration on the outside of the pail.
Monday, October 10, 2011
Thanksgiving - Featured Designer Challenge by Ute Thenert

Till now this is my personal favorite project for the year!
I had a lot of fun! I cut out the Rectangle Box from QuicKutz and distress it with Ranger Ink for making a crate. All the vegetable and fruits are designed and handmade by me with Polymer Clay / Fimo.
You can use as decoration for house or table for Thanksgiving. Kraft Chipboard
Friday, October 7, 2011
Thanksgiving - Featured Designer Challenge by Mary Pfaff
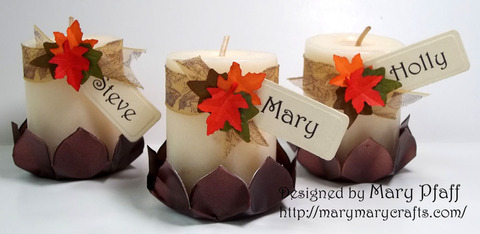
Candle Place CardsSupplies:
Lifestyle Crafts ~ Nesting Bloom DC0167, Die #3, Metal Sheets L-Media-001
Spellbinders ~ Tags Trio S3-148
Copics ~ E79 Cashew
Creative Impressions ~ Sheer Gold Leaf Ribbon
Vanilla Votive Candles (3)
Small Fall Leaves
Glue Dots
Directions:
Cut Nesting Bloom, die #3 with Metal Sheet, make 3. Spray both sides with Copic E79. Fold leaves up to make base.
Print names. Cut/Emboss with Tags Trio, small. Tie onto candle with ribbon. Add fall leaves. Insert candle into base.
Lif
Spellbin
Copics ~ E79 Cashew
Creative Impressions ~ Sheer Gold Leaf Ribbon
Vanilla Votive Candles (3)
Small Fall Leaves
Glue Dots
Directions:
Cu
Print names. Cut/Emboss with Tags Trio, small. Tie onto candle with ribbon. Add fall leaves. Insert candle into base.
Thursday, October 6, 2011
Thanksgiving - Featured Designer Challenge by Ute Thenert

Nesting Frame 1 (DC0174) / Nesting Frame 4 (DC0177) / Nest Round Tags (Tags-02) / Frame - Marianne Design Die / Rhinestones - Basic Grey
For this card I used the nesting frames from QuicKutz and one size of the nesting round tags. They are very flexible because of their different sizes and so you can use them for nearly all crafting ideas.
Wednesday, October 5, 2011

Tuesday, October 4, 2011
Thanksgiving - Featured Designer Challenge by Mary Pfaff

Thanksgiving Frame
Supplies:
Lifestyle Crafts ~ Nesting Frame 6, Die # 7,10,11,13,16,19
La-La Land Crafts ~ Winter Marci stamp
Fiskars ~ Woodgrain Embossing Plate
Copics ~ E0000, Eooo, E47, E57, E59, YR04, YR07, 0
The Paper Company ~ Brown card stock
Georgia Pacific ~ White Cardstock
Computer ~ CK Script Font size 20 & 11
Orange Tiny polka Dot Paper
Ranger ~ Tim Holtz Distress Ink (Vintage Photo)
Fabric Barn ~ ¼” White Grossgrain ribbon
Cardboard
Clear Plastic
Misc. mini leave and foliage.
Instructions:
Using Die # 19, 16. Cut cardboard and papers. Emboss & ink brown paper. Adhere papers to cardboard.
Tape Die #10 & 13 evenly spaced apart. Cut cardboard and paper. Ink brown paper. Adhere to frame.
Cut plastic with Die #11. Adhere to back of frame.
Type word out. Cut/Emboss with Die #7. Adhere to center of Polka a Dot piece. Add leaves.
Add mount foam to back of frame. Adhere over saying. Adhere this piece with mount foam to brown inked woodgrain piece.
Color Winter Marci.
Supplies:
Life
La-
Fiskars ~ Woodgrain Embossing Plate
Copics ~ E0000, Eooo, E47, E57, E59, YR04, YR07, 0
The Paper Company ~ Brown card stock
Georgia Pacific ~ White Cardstock
Computer ~ CK Script Font size 20 & 11
Orange Tiny polka Dot Paper
Ranger ~ Tim Holtz Distress Ink (Vintage Photo)
Fabric Barn ~ ¼” White Grossgrain ribbon
Cardboard
Cle
Misc. mini leave and foliage.
Instruction
Using Die # 19, 16. Cut cardboard and papers. Emboss & ink brown paper. Adhere papers to cardboard.
Tape Die #10 & 13 evenly spaced apart. Cut cardboard and paper. Ink brown paper. Adhere to frame.
Cut plastic with Die #11. Adhere to back of frame.
Type word out. Cut/Emboss with Die #7. Adhere to center of Polka a Dot piece. Add leaves.
Add mount foam to back of frame. Adhere over saying. Adhere this piece with mount foam to brown inked woodgrain piece.
Color Winter Marci.
Cut out. Adhere to right side of frame. Add foliage.
Cut a 2” x 5 “ piece of cardboard. Score 1” down. Fold and adhere to back of frame for stand. Add 2 ½” ribbon to hold.
Cut a 2” x 5 “ piece of cardboard. Score 1” down. Fold and adhere to back of frame for stand. Add 2 ½” ribbon to hold.
Monday, October 3, 2011

Sunday, October 2, 2011
Thanksgiving - Featured Designer Challenge by Marley van der Heijden

For this card base I have used the Quickutz/Lifestyle Crafts (DC0180) " Nesting Frame 7... really great dies to make a shaped card! So many fun shapes... for the design paper I used a smaller nesting frame and for the image another smaller one... there are 22 dies in this package!!! Isn’t that amazing?
Used some design papers from Basic Grey, a ribbon, flowers, brads and some letter stickers and pearls.
Happy Thanksgiving!
Saturday, October 1, 2011
Thanksgiving - Featured Designer Challenge by Emilia Stanojcic

Supplies
Quickutz / Lifestyle Crafts Cupcake stand DC0121Quickutz / Lifestyle Crafts Wildflower Spring setQuickutz / Lifestyle Crafts Recipe set CC-SHAPE-057-15
Quickutz / Lifestyle Crafts Heritage CC-SHAPE-056-10
Santa’s Workshop (Oval die)
Sizzix Hearts Primitive 657012
Aussie Scrap Source cardstock various colors

Quickutz / Lifestyle Crafts Heritage CC-SHAPE-056-10
Santa’s Workshop (Oval die)
Sizzix Hearts Primitive 657012
Aussie Scrap Source cardstock various colors

Cut 10 each of the Circles from the Cupcake stand and wildflower die.
Cut 2 cupcake stands and stick them together.
Cut out the body and backing card (both free hand drawn).
Lastly cut 1 love heart, 2 banners (one for a shadow effect) and a small triangle.
Cut 2 cupcake stands and stick them together.
Cut out the body and backing card (both free hand drawn).
Lastly cut 1 love heart, 2 banners (one for a shadow effect) and a small triangle.

Roll each of the circles and wildflowers into a cone.

Stick to wildflower cone inside the circle cone. These will form the turkey feathers.

Stick the stand together (it doesn’t matter which way).

Stick all of the feathers to the backing board then stick it to the stand. I put a slight bend in the stands feet to make sure it is able to hold the weight of the turkey’s body.

Cut out the ovals and write what you are grateful for on each card.

Stick the body on then insert each card into the feathers.
Happy Thanksgiving to you all!
Friday, September 30, 2011

Wednesday, September 28, 2011

Tuesday, September 27, 2011

Saturday, September 24, 2011
Jaimie Ramsey

Bazzil white cardstock
Bazzil brown cardstock
Prima flower
Tattered Angels Glimmer mist
Pages from an old book
Stampin Up! Butterfly punches
Stampin Up! word window punch
Stampin Up! modern label punch
Tim Holtz Distress ink
Kaisercraft pearls
Bazzil brown cardstock
Prima flower
Tattered Angels Glimmer mist
Pages from an old book
Stampin Up! Butterfly punches
Stampin Up! word window punch
Stampin Up! modern label punch
Tim Holtz Distress ink
Kaisercraft pearls
Thursday, September 22, 2011


Tuesday, September 20, 2011

Sunday, September 18, 2011
Sabine Schroll

Rev-0200 Love Birds, 000 Santa's Workshop Die Set ONLY (Oval Label With Holes: 2 1/4" w x 7/8" ), Barn Door Distress Ink Pad
Friday, September 16, 2011
Halloween - Featured Designer Challenge by Ute Thenert

It´s Halloween!
I looked at the dies I had and what I could use for a Halloween card...this is the result.
The background paper is embossed, the die cuts are all distressed and stained with Ranger Ink in different colors. The QuicKutz Pumpkin is embossed by hand. Again I layered all with foam pads in different thickness.
I looked at the dies I had and what I could use for a Halloween card...this is the result.
The background paper is embossed, the die cuts are all distressed and stained with Ranger Ink in different colors. The QuicKutz Pumpkin is embossed by hand. Again I layered all with foam pads in different thickness.
Subscribe to:
Posts (Atom)