Lifestyle Crafts Nesting Circles (L-CC-001)
Lifestyle Crafts Nesting Scallops (L-CC-005)
Lifestyle Crafts Blossoms (DC0073)
Bazzill Bling October cardstock
Bazzill Bling Flat Broke cardstock
Bazzill Bling Glass Slipper cardstock
Cut out in the October Cardstock
Approx. 25 each e of the 3rd smallest blossom
Approx. 25 each e of the 3rd smallest blossom
One 5” scallop
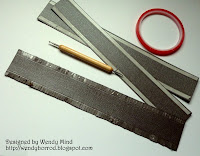
Stick double sided tape on both edges of each of the 3
strips (it is important to do this before you start fringing
the cardstock.
Trim at small intervals on each edge of all 3 strips so you
have a‘fringed’ look.
Trim at small intervals on each edge of all 3 strips so you
have a‘fringed’ look.
to fit. The widest width strip will be for the largest circle etc.
Step 4
Once you have attached the card strips to the bottom circle, the top
circle will fit on nicely.
Once all 3 layers of the cake have been put together attach them
ontop of each other with glue and then attach to the scallop.
Attach theGlass slipper strips of card around the bottom of each
layer of the cake.
Attach theGlass slipper strips of card around the bottom of each
layer of the cake.
To finish pinch each of the petals of the small blossoms, attach them
to the cake and add a sparkly.
To make the flower on the top of the cake, layer 3 of the smallest
blossoms on top of each other and then adhere to the cake.
To make the flower on the top of the cake, layer 3 of the smallest
blossoms on top of each other and then adhere to the cake.


No comments:
Post a Comment