Thursday, December 2, 2010

Rita's Ready Set Create


paper: American Crafts "be jolly"
Quick Kutz: "Santa Stop Here" & "Holiday die set (santa)"
Zip Dry by Beacon Adhesives
3D foam squares by 3L
Copic:YR01 Peach Puff
ribbon & button from stash
Tim Holtz distress ink Old Paper
door hanger $1 bin at Michaels


Step 1

adhere paper to door hanger, trim and sand. I use basic grey's precision file set, but sand paper will
work just as well. cut out the center circle, and sand. Now do the flip side of the door hanger. Even
though you won't see that side, beleieve me it will BUG you if you don't finish it as well.


Step 2

Ink around all the edges with distress ink. Add "present" to door hanger.


Step 3

Cut out all pieces of Quick Kutz dies being used. Color any pieces that need to be colored, in my case I
used a copic marker, in "peach puff," for Santa's face.


Step 4
Assemble all pieces as needed, and add to door hanger. Santa has the 3d foam pieces behind him.


Step 5
finishing touches. For this I just added buttons.

Thank you for stopping by for my monthly tutorial come visit me at my blog  http://mycreationsbymy.blogspot.com/


Tuesday, November 23, 2010

Did Someone Say Kits?


For a complete list of kit availability check out the web store at http://stores.ebay.com/Creating-Everlasting-Memories, look for your favorite designers name and you are just a click away from getting everything you need to create any of the kits listed above.

From our house to your's we at Creating Everlasting Memories would like to wish you and your families a wonderful Thanksgiving, please remember to keep those who are less fortunate in your prayers. God Bless.

Sunday, November 21, 2010

Mary's Trash To Treasure

Can you guess what this was made out of? Well let me show you how you can turn ordinary trash into beautiful treasure.Today I am going to show you how to create this Cake Gift Tin out of things you might already have around the house.

To start I used a 4 oz. can green chili can, frozen orange juice lid, Cuttlebug dots embossing folder,  Spellbinders Eyelet Circle die # 5, Standard Circles LG die # 4 & 5, Prima Pink Roses, white & pink cardstock.

First remove the lid from the frozen orange juice and label from the green chili can.  Wash. 
To make pattern for can, wrap cardstock around can.  Hold.  Trace top and bottom edge with pencil.  Mark for length.  Cut bottom edge.  On top edge, cut 1/8” above traced line.  (This allows for lid to fit on top).  Copy onto cardboard for permanent pattern.


       Emboss cutout.  Flip around and line up last row of dots.  Emboss again.

Cut two Standard Circles die #5. One from die #4. All from white cardstock.
Cut two Eyelet Circle die # 3 from pink cardstock.
Emboss smallest circle with Cuttlebug dots.
Adhere one large white circle to the bottom of pick Eyelet circle. Repeat.
Add small dot white circle to one layered circle. Adhere to flat side of frozen orange juice lid.

Thursday, November 18, 2010

Black Friday Extravaganza

THE BIGGEST, THE BESTEST, THE ONLY EBAY

"BLACK FRIDAY"
SALE WORTH VISITING

DISCOUNTS SO HIGH, YOU DON'T WANT TO MISS IT!!!

Starts: November 26th 12:01am
Ends: December 5th 11:59pm


EARLY BIRD DEALS
November 26th 12:01am - 11:59pm


(There Will Be Some SPECIAL SPECIAL Pricing During These Hours)

Tuesday, November 16, 2010

November ATC Tuesday Winner Is......

I wanted to thank our followers who participated in this months ATC Tuesday, the design team voted and the winner is Christy. Congratulations Christy please email stampnterre@cox.net with your mailing address. This was a wonderful ATC month and I look forward to even more participants as we grow, thank you and have a wonderul day.

Sunday, November 14, 2010

Heidi’s How’d She Do That? Tips, Tricks & Techniques

Crepe Paper Flowers and Glimmer Mist—You Design It!

Good morning! I hope you are having a wonderful and relaxing weekend. Today I will be sharing with you how to design and create your own crepe paper flowers and you will get to customize them choosing the colors you would like.

To start you will need white crepe paper, this can be found in the party section at most discount stores and you will also need a couple colors of your favorite Glimmer Mist by Tattered Angels. I wanted to create some flowers with a pink/coral look so I used Tutti Fruitti, Cotton Candy (Chalk), Tiger Lily and Iridescent Gold.

I lightly misted the crepe paper starting with Tutti Fruitti, then Cotton Candy and lastly with Tiger Lily. You want to have a good covering but be careful not to saturate the crepe paper.


Next carefully dry the crepe paper with a heat tool.


Next you will need two circle punches a large and smaller one. I used a 1" and 1-1/4" punches.

Cover a piece of cardstock in a complimentary color with your favorite adhesive. I used Adhesive Sheets from SCRAPBOOK ADHESIVES By 3L™. Punch out 2 large circles and 1 small circle. If you don’t have adhesive sheets you can also used your favorite liquid adhesive but punch you circles first and then apply the liquid adhesive.

Adhere the crape paper around the circle folding the paper and crimping it just like you would make a fan fold. Continue until you have went all the way around the circle.

This is what your two pieces will look like.

Free hand trim around the edges to create a basic flower shape.


Next layer the two flower pieces and scrunch the flower into shape. I used a 3D Foam Square to layer the two pieces.

To create your second flower take a piece of the crepe paper (12") and roll it up as shown in the photo. Then start in the center of the circle winding the crepe paper around until the circle is completely covers and trim.

Lightly mist both flowers with Iridescent Gold Glimmer Mist and heat set.


On the smaller flower I also applied Chandelier Glimmer Glam to add a little more sparkle.

Here is a close up of both flowers. I added a pearl brad to the larger one and prima pearls to the smaller one.

Supplies

Paper: White Crepe Paper, Cardstock

Accessories: Tattered Angels Tutti Fruitti, Cotton Candy (Chalk), Tiger Lily and Iridescent Gold Glimmer Mist, Chandelier Glimmer Glam; Prima Pearls; Pearl Brad; Heat Tool; SCRAPBOOK ADHESIVES By 3L" Adhesive Sheets, 3D Foam Squares; Circle Punches

Thank you so much for stopping by today! I hope you enjoyed the flower tutorial and if you create and any crepe paper flower we would love to see them!

Hugs & Smiles,

Heidi

My Blog: http://embellished-dreams.blogspot.com/

Tuesday, November 9, 2010

ATC TUESDAY


Materials:
Karen Foster - Snowflake Brads
Foam Squares

Instructions:

1) Cut creative scrap to 2 1/2 x 3 1/2
2) Stamp "Let it Snow" in the upper right corner with black ink.
3) Embellish with brads and pearls
4) Use diamond stickles to add shimmer to creative scraps.
5) Cut raffle tickets and pop up with foam squares

Materials:
JustRite 15-pt. Times New Roman Alpha stamps

Instructions:
1) Cut glittered snowflake CS to 2 1/2" x 3 1/2"
2) Round corners with corner rounder
3) Cut/Emboss die shapes from CS -- I cut sign post & North Pole sign twice/glued together for strength
4) Stamp signs (leaving space for spinner piece) & distress edges with Vintage Photo ink
5) Attach game spinner with brad & add brad to sign post
6) Attach workshop sign to larger backing piece with foam tape & glue to sigh post
7) Attach sign post & North Pole sign with with foam tape
8) Add glue dot to workshop sign for stability


Materials:
QuicKutz - Jolly mini ornament
Prima "e" - Rhinestone Bling
Pop Dots
Ribbon

Instructions:
1). Cut stripe paper 2 1/2 x 3 1/2
2). Cut Merry Christmas paper with birds 2 1/2 inch square.
3). Trim bottom edge in a wave pattern using scissors and adhere to stripe paper.
4). Cut out an additional "Merry" and adhere with pop dots.
5). Using gold stickles embellish the trimmed wave edge of pattern paper.
6). Die cut "jolly" mini ornament, add ribbon through loop and adhere to card with pop dots.
7). Embellish "burst" on the ornament with gold stickles.
8). Add Bling for the finishing touches.


Materials:
Paper: American Crafts Designer Paper; Crafty Secrets Christmas Creative Scraps
Ink: Ranger Antique Linen Distress Ink

Accessories: Tattered Angels Red Velvet Glimmer Mist, Chandelier Glimmer Glam; Prima Red Rose, E Line Pearls (green); SCRAPBOOK ADHESIVES By 3L™ My Stik™; Beacon Adhesives Zip Dry; Vintage Lace

Instructions

1) Cut designer paper 2-1/2" x 3-1/2", Cut Crafty Secrets image and ink both pieces with Antique Linen Distress Ink.
2) Apply Chandelier Glimmer Glam to the white fur on the Crafty Secrets image and carefully heat set with heat tool.
3).Darken Prima rose by applying Red Velvet Glimmer Mist and heat set with heat tool.
4).Adhere Crafty Secrets image to designer paper using My Stik™. Add rose and lace using Zip Dry and for
the finishing touch add the green pearls.


Materials:

The Paper Company
Spellbinder's: Assorted Leaves S4-076
QuicKutz: Autumn Twigs
Cuttlebug: Pumpkin Embossing Folder
Tim Holtz Distress Ink: Vintage Photo
Stampin' Up: Give Thanks

Instructions:
1). Cut cardstock 2 1/2" x 3 1/2". Emboss with Pumpkin Folder. Sand.
2). Cut/Emboss leaves. Sand.
3). Cut nuts. Sand.
4). Stamp. Layer with mount foam.
5). Adhere all pieces.

Thank you all for stopping by our 2nd ATC Tuesday, we hope you have enjoyed what our Design Team has created. To be eligible to win a prize this month submit one ATC Card using the link below, you will have until Friday, November 12 at midnight to submit your entry. Our DT will be voting on a winner. Good Luck and thank you for playing alot.


Sunday, November 7, 2010

ATC TUESDAY.......NOVEMBER 9th

Hello Fellow Crafters, just a friendly reminder that Tuesday, November 9th is ATC Tuesday. If you would like to participate send your entry to stampnterre@cox.net, We will accept entries until Friday, November 12th at midnight, the design team will vote on a winner and we will post our winning entry as well as the other entries right here on the CMIT Blog. We look forward to seeing what you create......don't forget there is a prize for the winning ATC card.

Thursday, November 4, 2010

Welcome to "Rita's Ready Set Create." I will be showing you how to create projects from start to finish as well as offering some tips on things such as how to choose your paper (for example---all paper used for today's cards is from the same line, American Crafts "jolly". This way everything is guranteed to match!


Join me here on CMIT's blog the first Friday of every month, to see what new thing I've come up with for you to recreate at home! :)

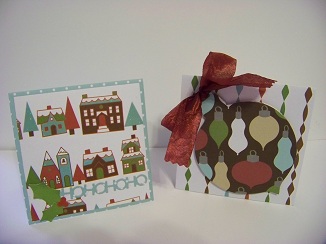
So, since Christmas is right around the corner, and everyone has to start thinking about getting their Christmas cards done and in the mail (at least you should be), I thought this would be a good place to start. So today we are making mini Christmas cards!!!


Why mini Christmas cards? Well for starters you can make 3 cards from 1 sheet of 12" x 12" paper, all cards are cut to 4" x 8" (4" x 4" when folded). And #2, I LOVE this QuicKutz "jolly" die set, but they are "mini's".....so mini cards seemed to be the right choice.


So for today's cards ALL paper is from American Crafts "jolly" line, ALL dies are QuicKutz "jolly" die set----this is the simplest way to make sure everything coordinates, use the same line of products for all!


All of my supplies, except for the ribbon and button used on card 3, are all from CMIT online e-bay store.

Card 1

Cut paper topper to 3 3/4" x 3 3/4. " I used the same paper for my "hohoho" as I did for my card base, and cut my holly leaves and berries from the "tag" piece of cardstock, (since these are mini dies, they fit).

Card 2

I cut 2 of the ornament dies. I glued one to the card and used pop-up dots to add the 2nd one directly over the first, leaving the "hanger piece" unglued on both. I then added my ribbon, through the hanger.

Card 3

This is my favorite by the way! :) And the one that is different in design. For this one cut your front piece to 4" x 4" but cut the "roof" piece to 4" x 5 1/2" because this will be the back of the card. "Trim" the scallops on what will be the front of the roof, to give it a gingerbread look, then fold it over the front, to make the actual roof and glue it at the "roof" top. Do not glue the whole piece, this way you can curl up the "scallops" slightly at the bottom. I added the "gingerbread people" die at the bottom of the card, and put "prima" pearls on the girls. Note on the pearls: If you buy a "line" of pearls or the "Swirl" design ones, you can cut them apart with an exacto knife and use what you like on various projects. This is what I did here. For a finishing touch I added some ribbon and a button (with hemp) to the top of the card.

Card 4

Just like in card 1, you cut the topper to 3 3/4" x 3 3/4," and glue to the card. I cut a line of light blue from the "striped" paper and added it to the topper, then I added my "be jolly" die on top of that. For something different I cut out an extra "spiked hair snowman" and using pop-up dots, I added him on top of the original one on the card, bottom right.

Well I hope you've enjoyed today's tutorial and that it has inspired you to make your own mini Christmas cards. Using today's method of 4" x 4" cards, you can make a dozen Christmas cards from 4 sheets of 12" x 12" paper and whatever accent paper you choose. I recommend buying a kit of paper, like I used, to make sure they will match. To see the cute and festive holiday Gingerbread House tin I created from this same paper pack visit my blog at http://mycreationsbymy.blogspot.com/

Thank you for stopping by my first Friday of the Month tutorial, I look forward to seeing you next month.
Be sure and join us for ATC Tuesday on November 9th!!!! :)

Rita

Monday, November 1, 2010

New For November!!!!

There is alot happening this month so mark your calendars:

ATC Tuesday - November 9th

Heidi’s Tips and Tricks - November 14th

Terre’s Scrap Therapy - November 27th

Mary’s Trash to Treasures - November 22th

Rita’s Ready Set Create - November 5th

Marge’s Card Time - November 15th

Each design team member will be doing segments once a month to teach a tip, trick or tutorial to help the beginner, intermediate and advanced crafter. We hope you will join us starting this Friday with Rita's Ready Set Create.


Wednesday, October 27, 2010

Spellbinders Large Format Dies Are Here!!!!

This cute and adorable layout was created using the new large format LF-111 Grand Scalloped Ovals and LF-110 Grand Ovals

This elegant and rich looking card features several of the new Spellbinders die templates including the LF-190 Grand Labels Four and the S4-296 Nested Hearts both of these elegant dies are a must have!
My Santa baby features the new large format LF-126 Grand Squares and the LF-127 Grand Scalloped Squares. Thank you Terre Fry for these wonderful projects using Spellbinders new large format die templates.

Monday, October 25, 2010

Snowy by Mary Pfaff

Here is a card created by Design Team member Mary Pfaff, she created this fun and festive card using "Snowy" by Penny Black, and the pattern paper is Wonderful Winter by My Minds Eye, Thank you Mary for creating such a wonderful card, stay tuned as there will be a lot of fun and creative projects for your viewing fun starting next month the DT will be hosting tutorials on special projects, ATC Tuesday and even "Kits" available for purchase from the online store...so stay tuned. Have a wonderful week.

Tuesday, October 19, 2010

THE WINNER IS...............Janice Burchell

Happy Tuesday everyone, I hope you enjoyed all of the beautiful ATC cards that our design team created, we have a winner for this month's ATC Tuesday Challenge....Janice Burchell. Congratulations Janice, please email stampnterre@cox.net your mailing address and send us a link to your blog if you have one as we would love to stop by and see what else you have created. Here are the beautiful entries and I must say...Janice was so excited to participate as she loves creating ATC cards she sent in 4 entries, here is what she created:


Thank you for participating in our first ATC Tuesday and we hope that you will join us next month for another round of ATC fun. Stay tuned as the design team is creating a few new programs that you are sure to enjoy so until next time, have a fun and wonderful week crafting.

Tuesday, October 12, 2010

ATC TUESDAY

ATC Card created by Terre Fry

Materials:
Crafty Secrets  - Altered Fairies Creative Scrap
My Minds Eye - Signature Christmas Pattern Paper
Zva - Black Rhinestones
Button
3L - Foam Squares
Beacon Adhesive - Zip Dry
Doily
Copic Markers

Instructions:
1) Cut cardstock to 2 1/2 x 3 1/5
2) Attache pattern paper and trim
3) Airbrush doily pattern on pattern paper with Copic markers
4) Cut out (2) fairies and use foam squares to add dimension
5) Cut out Make A Wish, adhere to card front
6) Embellish card front with Zva and button.

ATC Card created by Mary Pfaff


ATC Card created by - Margarita Ybarra

Material:
My Minds Eye Signature Christmas
Crafty Secrets "Christmas" creative scraps
Tim Holtz distress ink Old Paper
Sheer ribbon cut to 12"
Prima E pearls
Tim Holtz Stickles "Diamond"

Instructions:


1) Cut pattern paper to 2 ½ x 3 ½
2) Ahdere Crafty Secret image with Zip Dry
3) Ink all edges with Tim Holtz Old Paper Distress ink
4) Wrap sheer ribbon around pattern paper to look like present
5) Embellish with Prima “e” pearls and Diamond Stickles (all white trim edges)


ATC Card created by - Heidi Blankenship

Material:


Paper: Ivory, Black Cardstock
Stamps: Crafty Secrets Birds at Home stamp set
Ink: Ranger Brushed Corduroy Distress Ink; Tsukineko Memento Tuxedo Black Ink
 Accessories: Crafty Secrets Girlfriends Creative Scraps; Tattered Angels Iridescent Gold Glimmer Mist; Prima E Line Pearls; SCRAPBOOK ADHESIVES By 3L™ Crafty Power Tape, 3D Foam Squares, Pink Ribbon

Instructions:


1. Cut Crafty Secrets image 2-3/4'' x 2-1/4'', cut word blocks.
2. Ink edged of image and word block with Brushed Corduroy ink.
3. Mat image with Black cardstock and trim edges.
4. Cut Ivory cardstock 3-1/2'' x 2-1/2'', stamp flourishes from Birds at Home stamp set with Tuxedo Black ink. Ink edges with Brushed Corduroy ink.
5. Mist all paper pieces with Glimmer Mist.
6. Adhere paper pieces as shown in the photo. Use 3D Foam Squares to add dimension to work blocks, add pearl and ribbon.


ATC Card created by - Marge Robertson


Materials:


Spellbinders - Graveyard Scene and Shapes dies; Witches Brew dies; Standard Circle Dies; Gold Premium Craft Foil
Tim Holtz: Vintage Photo Distress Crackle Paint
Copic Markers


Instructions:


1) Cut cardstock to 2 1/2" x 3 1/2"
2) Cut/Emboss die shapes from foil & CS; cut grave piece to 2 1/2" to fit card
3) Use rubbing alcohol to remove paint from foil for silver grave marker highlights
4) Color crow and plants with Copic markers
5) Cover bottom "dirt" area with crackle Paint & set aside to dry
6) Attach shapes to black CS

Join our Design Team in creating your very own ATC card, send your submissions to stampnterre@cox.net all entries must be received no later than 12 Noon on Friday, October 15th, the design team will vote on one winner and the winning submission will be annouced on Tuesday, October 19th .. Thank you for stopping by and please join the ATC fun.

Sunday, October 10, 2010

DRUM ROLL PLEASE!!!!!!

AND THE WINNER IS......................................................

True Random Number Generator Min: Max: Result: 3 Powered by RANDOM.ORG


Pam and Presley said...

AWESOME! I absolutely LOVE this card, the colors the black vine going all around the card and the beautiful vintage Halloween scene.

Thank you so much for sharing

Pam

pamandrandy@gmail.com

October 8, 2010 5:49 PM

Pam and Presley said...

I also wanted to thank CMIT and all your designers for a great blog shop I had a lot of fun and thank you for a chance to win an AWESOME prize of the gorgeous

flowers I am a flower NUT!!!

Thank you

Pam

pamandpresley

October 8, 2010 5:54 PM


We would like to congratulate Pam on winning this wonderful bag of Prima's, Pam if you could please email your name and address privately to stampnterre@cox.net I will have your wonderful prize sent out, the design team would like to thank everyone who participated in our first of many blog hops and a special thanks to Teresa at Creating Everlasting Memories for her generous donation of the HUGE bag of Prima's.
DON'T FORGET ABOUT WHAT WE ARE PLANNING ON TUESDAY, OCTOBER 12th RIGHT HERE

Creative News Flash No 2….…………


ATC Tuesday – Second Tuesday of Each Month


WHAT IS “ATC” TUESDAY???

Here’s the buzz…..The CMIT/CEM Design Team (Creating Memories In Time/Creating Everlasting Memories) will create ATC Trading Cards and publish them on the CMIT Blog (http://cmitonlineblog.blogspot.com/) for everyone to see, we will provide instructions, and material list to duplicate the created ATC’s. We encourage you, our viewers, to play along. All you need to do is send us your very own ATC creation. Our design team will choose a winner, and a NICE prize will be sent to the “creative” person for each months competition. The first ATC Tuesday will be October 12th, email all submissions to stampnterre@cox.net . Please provide your name, blog information (if you have one), and email address.


WHAT IS AN “ATC”???

ATC stands for Artistic Trading Cards….they are the size of a baseball card (2.5” x 3.5"}, come in many themes and people trade them as though they are trading cards. For our first ATC Tuesday you can choose any theme you like, from time to time I will publish a theme to be used so you can join in the ATC fun.

Thursday, October 7, 2010

CMIT BLOG HOP

The Creating Memories In Time’s Design Team would like to thank you for stopping by our blogs to check out our creativity. This blog hop is a two part hop!


Here is a spooky card that I created for today's blog hop, I used Crafty Secrets Vintage Scraps, May Arts Leaf Ribbon, My Minds Eye pattern paper and adhesive.

First in order to be eligible to win this fabulous bag of Prima Flowers


You must leave a creative comment on each of the following blogs

Terre Fry http://terresscraptherapy.blogspot.com/

Heidi Blankenship http://embellished-dreams.blogspot.com/

Margarita Ybarra http://mycreationsbymy.blogspot.com/
Mary Pfaff http://crafty-cabin.blogspot.com/

Marge Robertson http://www.maricopastamper.blogspot.com/

CMIT Blog http://cmitonlineblog.blogspot.com/ (you are here)


The second part of this blog hop is, sign up as a follower of the CMIT Blog, we will be hosting challenges, contests, tutorials and a new program called ATC Tuesday so you will not want to miss what we are up to next. Stay tuned for more creative news flashes.

Once we have verified that both parts of the blog hop have been completed we will pick one lucky winner from one of the 6 blogs, you will have until 12 Noon on Saturday, October 9th to participate, we will announce the winner on Sunday, October 10 right here on the CMIT Blog. Tthank you for stopping by and come back to see what we come up with next.

ATC Tuesday will begin on October 12th so come take a look at the CMIT blog to see what the design team creates, play along to win a prize.